
If something sits still long enough, chances are pretty good that I will hang a banner from it. I have always thought that garlands and banners add a certain magic to any setting, more so than most other décor. From the vibrant and intricate papel picado banners that line the streets in Mexico to the homemade popcorn strands on a child’s Christmas tree, you can find various forms of garland almost anywhere you look. With endless possibilities in style, medium, texture, length and more, I’m confident in saying there is always a way to incorporate a banner into your space or event!

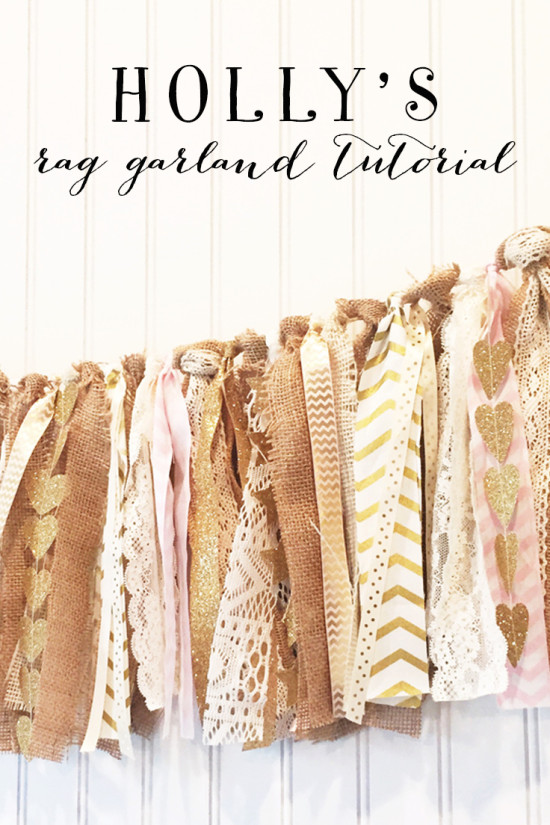
One of my favorite current trends is the “rag garland” banner. When a friend of mine asked me to create a custom piece that could be used for her baby shower and as a permanent fixture in baby girl’s nursery, I immediately knew rag garland was the way to go. I’d been looking for the perfect excuse to play around with a mixed media style rather than the traditional fabric version, so I was thrilled to discover that the nursery theme was burlap, lace, and gold. Here’s what I came up with!

Rag garlands are a surprisingly simple and quick DIY with no special tools or equipment required. Follow the tutorial below to help you get started on one of your own! The materials and steps here can be used to recreate the burlap and lace banner, but I encourage you to choose textiles that suit your personal style, room décor, or event theme. Part of the fun is putting your own twist on it. Don’t hesitate to try something new!
WHAT YOU’LL NEED

Materials
- jute twine (approximately 8 ft)
- natural burlap ( ½ yard )
- cream burlap ( ½ yard )
- light pink cotton fabric ( ½ yard )
- gold/ivory cotton fabric ( ½ yard )
- ivory lace knit fabric ( ½ yard
- (1) spool ½-inch ivory/gold polka dot ribbon
- (1) spool gold glitter 1-inch ribbon
- (1) spool 1.5-inch burlap/lace ribbon
- (1) spool 2-inch ivory lace trim
- gold glitter cardstock
Tools
- scissors
- pinking shears (optional)
- rotary cutter, mat and acrylic quilting ruler (optional)
- assorted 1.5-1.75-inch shape paper punches
- sewing machine or needle and thread
Start by deciding the length and size you want your banner. I chose approximately 36 inches of actual garland to fit the wall above baby girl’s crib. Make sure to leave a few extra feet of twine on either end for hanging, especially if you’d like to use it on a mantle or as a table decoration.
For this size, I always plan to have 70 tassels total. Plan out your repeating pattern so you know how many strips of each material to cut. For instance, if you have seven different materials to use for tassels, you need ten strips of each to produce a repeating pattern.

Tassels around 11 inches long look great with this length of banner, but again you can choose to make them as long or short as you’d like. Each tassel is one strip of fabric that is double the length you’d like the tassels to be. In this case, for example, the 11-inch tassels will require 22-inch-long strips of fabric. Cut all of your fabrics into 18-inch x 22-inch rectangles. You will have extra fabric. Save it for a second banner!

One at a time, fold each different fabric in half—undecorated sides together—to get an 18-inch x 11-inch piece. With the fold at the top and starting from the right-hand side, use your rotary cutter and ruler to cut the fabric into approximately 1.5-inch strips. Cutting them at various widths is a great option too, which results in a little more of a rustic and textured look. Set your strips aside.
NOTE: Don’t worry if you don’t have the rotary cutting tool and accessories. You can always cut your strips the old-fashioned way (scissors)! You can even use pinking shears on some of the strips to add more texture.
Cut your trims, laces and ribbons into 22-inch pieces.

Lay all of the strips in your desired pattern order. You may have more than 70, but you can decide at the end whether to add the extras to your banner or not.

I do my best work sitting on the floor, so I like to tie my twine between two table legs or the legs of two chairs. If you prefer to stand, though, you can tie your twine between two taller chair backs. Make sure that the twine has just the slightest amount of slack and that the midpoint of the twine is in the middle of the two chairs.

Starting from the left side, use the “luggage tag” technique to loop each strip onto the twine. See the image above for a more detailed look at the looping technique.
NOTE: Don’t get discouraged if the “knot” of your first few tassels doesn’t come out looking quite like you had imagined, especially if you are using burlap. The burlap is much more difficult to get a smooth look from than the fabric, but the fraying and imperfections will just add to the banner’s character!

Repeat until you use all 70 strips. This gives you a great base banner, and you can skip to the final step of trimming now if you prefer to omit the paper garland additions.

Punch about 20 of each shape out of the glitter cardstock.

If you have a sewing machine, sew together short strips of vertical garland with each shape. You can also hand-string them using a needle and thread. Make sure to leave about 6 inches of a thread tail at the beginning of each garland, but trim the final tails as closely as possible.

Tie the short garlands onto the banner at various points. Trim the upper tail threads.

At this point, you can either leave the banner hanging between the two chairs or move it to its permanent location. Once you have it positioned as you’d like, trim any tassels that you feel may be too long. The tassels certainly don’t all need to be equal and in fact look better at slightly different lengths. But if you have any eyesores on your banner, this is the time to take care of them.

Done! Enjoy your new banner, which is sure to be a conversation starter and centerpiece at any gathering. Let us know how your project turns out! I can’t wait to see how everyone puts their own twist on it, and don’t be afraid to experiment with new materials, even the unconventional! As I said, the possibilities truly are endless.
Cheers!
Holly
PS: I know how easy it is to go to the craft store and meticulously select all your supplies only to come home and realize you forgot something (especially on tutorials like this, which have a lot of small parts). So to make your life easier, I’ve created a free shopping list for you to download and take with you. You won’t forget a thing!