Regardless of when exactly Easter falls each year, to me that’s when spring truly begins. The warm weather creeps in, and from the garden to the department store windows, bright fresh colors are seen everywhere. Shoppers fill the aisles in search of new spring wardrobes, and Easter Sunday attire is at the top of their list.
As a child, my own Easter dress was always handmade by my mother. Of course at the time I didn’t fully understand or appreciate this, and I remember the very last year she made a dress for me. My two older female cousins arrived at church on Easter Sunday, and we ran to get seats together just as we always did on that special day. But when I realized they were both sporting stylish color-blocked Gap Kids pieces, for the first time, I felt out of place in my home-sewn garment made out of bug-print cotton. I was mortified and requested only store-bought clothes from then on. As sad as I was, I wonder now if my mom was probably even sadder.

It’s been a good twenty years since that day, and I feel like it’s time to resurrect the homemade springwear!
I’ve recently been on a mission to wear more of what makes me happy, but more importantly, to have more of what I wear be something that I create. Constructing different pieces—whether it be a headband, a piece of jewelry, or a tote bag—has given me a new appreciation for the process and the people that do this daily on many different levels. And of course it feels good to wear something one-of-a-kind that’s my own personal style!
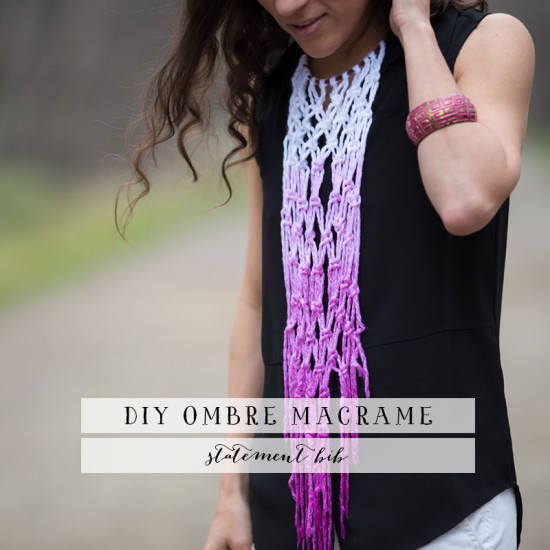
For my tutorial this month, I wanted to showcase a casual accessory I wore for Easter brunch (and egg-hunting!). I love scarves, but Texas weather and scarves don’t mix for too many months out of the year, so I thought a marriage of scarf+necklace would be perfect to still give that drapey scarf look but without the weight, bulk, and warmth of a true scarf.
I put my macramé skills to use and came up with this beauty!

Don’t let the macramé part scare you off. I promise this is one of the easiest pieces you’ll ever make! It uses the two simplest macramé knots, and the techniques can be mastered in minutes. Watch this short video, and refer to the written instructions below as well. Refer to the additional videos for detailed instructions on the two macramé knots used in this piece—larks head and square knot.
MATERIALS/TOOLS
Leather Lace
White yarn (thickness and texture of your choice)
Rit Liquid Dye
Scissors
Tape
Large Pot/Stove
Start by taping a 24-inch piece of leather lace to your work surface. Next, cut 12 pieces of yarn, each approximately 5 feet long. Secure these twelve pieces to your leather lace using larks head knots approximately 1 cm apart.
Now you’re ready to begin your statement bib!
Note: From here on out, each strand of your piece will be referred to by a number, 1 through 24, going from left to right. Take extra care to keep your strands separated and untangled so you know which strand is which number.
For your first row, tie a square knot (see square knot short video above) using strands (1-4), (5-8), (9-12), (13-16), (17-20) and (21-24).
Don’t pull the knots too tight, as this will take away from some of the texture and feel of the piece.
Next, tie square knots in (3-6), (7-10), (11-14), (15-18) and (19-22).
Tie square knots in (1-4), (5-8), (9-12), (13-16), (17-20) and (21-24).
Tie square knots in (3-6), (7-10), (11-14), (15-18) and (19-22).
Tie another row of square knots in (3-6), (7-10), (11-14), (15-18) and (19-22). Make sure to leave about one vertical inch between your previous knots.
Tie square knots in (1-4), (5-8), (9-12), (13-16), (17-20) and (21-24).
Tie square knots in (3-6), (7-10), (11-14), (15-18) and (19-22).
Tie another row of square knots in (3-6), (7-10), (11-14), (15-18) and (19-22). Make sure to leave about one vertical inch between your previous knots.
Tie square knots in (1-4), (5-8), (9-12), (13-16), (17-20) and (21-24).
Tie square knots in (3-6), (7-10), (11-14), (15-18) and (19-22).
Tie square knots in (5-8), (9-12), (13-16) and (17-20).
Tie square knots in (9-12) and (13-16).
Tie one final square knot using the center four strands (11-14).
Trim the remaining yarn into a graduated “v.”
Now you’re ready to dye your piece!
Note: Make sure to select the appropriate dye for your yarn. Because my yarn was 80% polyester, I chose Rit’s synthetic dye in super pink. Follow the dye’s stovetop instructions. Because some yarns can be fragile, try to leave your piece in the liquid for the least amount of time possible to prevent fraying and damage.
Following the dye’s instructions, heat your water on the stovetop. Add 3-5 drops of dye, then stir and submerge your piece up to the point you want the color to start. After 5-10 seconds, pull 5 inches of that piece out of the dye. Add 5-10 more drops of dye and stir while the yarn soaks. Wait 30-60 seconds and pull the piece up again, this time leaving only 4-6 inches in the dye. Add 10-20 final drops of dye, stir again and let soak for another 2-3 minutes or until you’ve reached your desired color.
Remove the piece from the dye completely, and let it hang to dry over a towel or stainless sink. Gently separate the bottom fringes. Avoid wringing or patting dry, as this can permanently change the shape of your fringe. I let mine dry overnight, and it was perfect the next morning.
Now show that baby off!

This piece is so versatile and can be worn with almost anything. Wear it for all sorts of occasions, from Sunday service over a maxi dress to brunch with shorts and simple top and then to an evening date night over a strapless black romper. It’s sure to start a conversation wherever you go! Don’t forget to send us photos of your statement bib this spring. We’d love to see how you style it!
And to my mom: I hope you know that you are the reason I create the things that I do. Your love of the unique and the handmade was passed on to me, and I can’t ever thank you enough for that. I hope that one day my own daughter will discover this same passion. That damn bug dress (and all of the others) were the inspiration behind this post, and I’m sorry it took me so many years to appreciate the gift you were giving me. I love you!

Another special thanks to Holly Natale of Holly Natale Photography for the gorgeous photos.