It’s no secret that yarn is my jam. And with both my wedding anniversary and my son’s birthday falling on October 31st, it’s no secret that Halloween is also my jam. So when I found out that my spooky yarn ghost DIY would be kicking off the month of October here at Model Behaviors, my head almost exploded.

Our inspirational word this month will be “explore,” and it gave this project the perfect direction. While I love to work with all different kinds of materials and techniques, I’m always looking for new ways to use some of my tried and true favorites. I chose to focus on exploring the possibilities with yarn this month. I use yarn nearly every day in some way or another, and I am still constantly finding new varieties, textures, and weights of yarn along with original ways to incorporate it into my pieces.
I also knew from the get-go that I would be using a piece of nature in this DIY, so I wanted to make a family affair of it and go on a little adventure to let the kiddos explore their surroundings and enjoy these first few days of fall weather we’ve had here in North Texas!

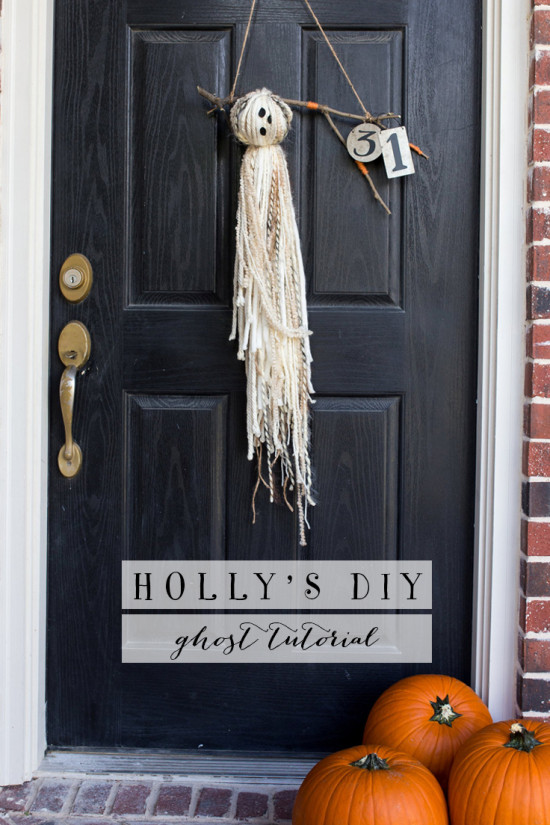
Now let’s get down to it. I realized this month that I have yet to do a wreath tutorial. I’m a sucker for wreaths. They’re your first impression when it comes to anyone from the mailman to the Girl Scout to the in-laws. They can convey welcoming warmth even on the surface of a closed door. And now that I’ve given you all the reasons to have a wreath, I actually want to present you with a wreath alternative. Hear me out! Because for Halloween, I feel like you have a free pass to go with the nontraditional. And in the midst of making probably the millionth yarn tassel of my life for a customer’s order, I had an idea!
Boo!

Don’t be scared away just yet! Trust me when I say this is the easiest DIY you’ll ever come across. Just follow the steps below.

MATERIALS
- approximately (7) different skeins of yarn or trim of different weight and texture in the neutrals family
- black felt
- branch/stick
- jute twine
- tape measure or ruler
- scissors
- glue gun or fabric glue
- orange yarn (optional)
- polyester fiberfill stuffing (optional)

Decide on an approximate length for your ghost. Will this be a front door hanger, a mantle adornment, an entry way decoration or something else? Double that to get the length for your materials. For instance, I wanted my ghost to be about two feet long, so my materials length would be about 48 inches. Cut 10-20 strands of each of your seven yarns/trims into your desired length.

Once you have all of your strands cut, mix them together so that you get a bit of variation, taking care to avoid tangling of the ends. Don’t worry about the ends not lining up exactly. You want a little bit of imperfection and asymmetry to achieve that whimsical/spooky/artisan look.

Choose an approximate midpoint of the yarn strand bundle. Again, don’t even consider exact measurements here. There is so much beauty in imperfection! Select one of your thinnest and most neutral yarns, and cut a strand of equal length to your others. Slide it underneath your yarn bundle perpendicular to the others, and secure with a tight knot. Knot it again so you can sleep at night.

Pick your yarn bundle up from the midpoint, and flip it upside-down so that the knot you just tied is on the underside of the bundle. The end tails will fall in with the rest of the strands this way, and you will have nothing to trim.

Gather the bundle using your thumb and forefinger approximately 5 inches down from the top/midpoint. Once again, using your thinnest and most neutral yarn, tie a full-length strand around the bundle, letting the end tails fall with the rest of the strands.

EEK! Now you have the basic body of your ghost! As I looked at it, I decided I wanted the head of my ghost to be a little more spherical. This is totally a taste thing, so you can skip this step if you’d like. However, if you do want to achieve this shape, simply stuff a bit of polyester fiberfill stuffing, cotton balls or even Kleenex into the head portion of your ghost. Manipulate the yarn to disguise any visible areas of your stuffing. Another options is to insert a white Styrofoam ball into the head between the previous two steps.

Cut three freehand ovals for the eyes and mouth from black felt, burlap or any other desired material. For a less cartoon look, avoid a symmetrical layout and instead position one eye slightly higher than the other. Secure these to your ghost’s head with a tiny dot of hot glue or fabric glue.
As he is, your ghost is complete! Feel free to hang him on his own if you’d like. You can even attach him to a grapevine wreath, suspend him from a tree branch in your yard or anything else you may dream up!

If you’d like to replicate the Model Behaviors version, start with the branch/stick you gathered. Trim it to your liking, and decide the placement of your ghost. I prefer an off-centered look, so I chose to hang him far to one side of my branch. Holding him in place, turn the unit over. You will have to get creative based on the shape of your specific branch when it comes to securing your ghost, but here are a few general steps:

- Slide one piece of yarn horizontally through about ten yarn strands on the back of the ghost’s head. Ideally do this at the midpoint or lower, keeping in mind that gravity will pull the ghost down a bit.
- Before even touching the branch, tie a knot to secure your yarn’s position at the midpoint of the ghost’s head.
- Pull the yarn upwards and behind the branch, loop each end around the branch and repeat the previous two steps to secure a knot on the top half of the ghost’s head as well.
- Bring the yarn back down, loop around the branch again and finally tie together the two loose ends.

As much as I wish I could be completely untraditional, Halloween is just not Halloween to me without at least a little pop of orange! I restrained myself by choosing a muted orange yarn with which to haphazardly wrap a few sections of the branch.

Finally, loop and tie a single length of jute twine to both ends of your branch. I wanted to accent the piece with these tin “31” numbers I found to make it a little more personal to our family while still maintaining some subtlety, but as you can see it looks just as great without!

As with all of my tutorials, I try to build in a ton of room for customization. This one is no exception. Embrace our inspirational word this month by exploring the possibilities in terms of size, textiles, hangers, accents and more. We can’t wait to see where you go with this one. Happy Halloween to all of our readers. Let’s kick this holiday season off right!

*Another special thanks to my sweet friend Holly Natale of Holly Natale Photography for snapping some gorgeous final photos.