Oh, the weather outside is frightful… Frightfully hot, that is! Every year around this time, as the temperatures rise and those lazy summer days start to get a little repetitive, I remember that one of my favorite “non-holidays” is approaching—Christmas in July!
In addition to a nice little marketing gimmick that breaks up the slow retail stretch between July 4th and back-to-school promotions, Christmas in July is also a fun way for folks to get their mind off the heat and start thinking ahead to the holiday season. And for me, it’s the perfect excuse to use some of my festive decorations an extra day or two each year!
Perhaps my most favorite Christmas decoration of all is a DIY that has been part of our family since I can remember. My dad designed and built the original one when I was a small child, and when my husband and I bought our first home and started our family, I knew I just had to have one of my own. A special thanks goes out to my dad for this great idea, for teaching me how to make it, for letting me borrow his tools, and so much more!

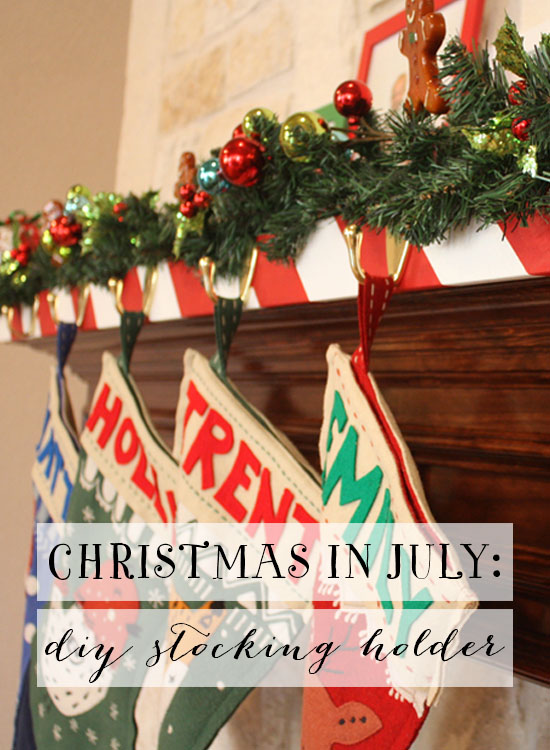
Here it is—a simple, thrifty, sturdy DIY stocking holder that doubles as the perfect mantel accent and doesn’t require any permanent changes or mounting. It can be adapted to fit any mantel type or size and can even be used in a window ledge, cutout, and more.

Like so many families, we started out using the individual decorative holders with a hook on each one, but the stockings inevitably fell down at some point during the holiday season from the weight of all of Santa’s goodies, bringing the heavy holder down with them. This solves that problem (and more) without having to drill into the mantel itself.
Follow these simple steps below to create your own, and remember that all of the cutting CAN be done with a handsaw. So don’t worry if you don’t have some of the power tools on hand! Some of the other tools, including a speed square, table clamps, and the chalk line reel are not absolutely necessary either but will enhance your result and make the construction a bit easier. You can also substitute different sized screws, lumber, hooks, et cetera. These are simply my recommendations and what I used personally.

WHAT YOU’LL NEED
- 8-ft 1×4” pine board
- (6) 1-1/4″ x 8GA drywall screws
- (6) hooks of choice with included hardware
- Tape measure
- Pencil
- Handsaw or power miter saw
- Drill
- 1/8” drill bit
- Countersink drill bit
- Phillips screwdriver
- Chalk line reel
- Table clamps
- Speed square
- Small piece of poster board or cardstock
- Scissors
- Red and white paint (craft/wood or enamel)
- Paintbrush
- Painter’s tape
Here we go!
Start by measuring the length of your mantel. Many standard mantels, including my own, are 6 feet long and anywhere from 8-10 inches deep. Decide if you want your stocking holder to hang over the edges of your mantel, meet flush with the ends, or even be slightly shorter. I wanted my holder to be as close to the length of my actual mantel as possible. I chose an 8-foot long 1”x4” select pine board because it was slightly thinner and lighter (weight-wise) than some of the other wood choices but sturdier and a little better quality than the more rustic cedar planks. This will help when you get to the painting and/or staining steps.

Take advantage of the convenient DIY cutting station at your local hardware store to go ahead and make your first cut at 72 inches. This will not only get your board to the correct length but will also hopefully allow for transporting it home in your car! Don’t forget to keep the extra 24-inch piece you cut off, as you will need this later.
(NOTE: If you don’t have a saw at home, go ahead and use the cutting station to cut the leftover piece into three 8-inch pieces now, and then you can omit the next step).

Using a power miter saw, cut your leftover 24-inch board into three 8-inch sections. These will act as the depth stabilizers for your stocking holder. If you plan to make a longer holder or have more than about six stockings, I would recommend adding a fourth stabilizer piece just for extra security.

Next, pop a line lengthwise down the middle of both the front side and the backside of your board using a chalk line reel. On the front, use a “V” to mark where the middle point of each stabilizer piece will be, starting with one directly in the center of your board (at the 36-inch point). I marked 6 inches from each end of the board as the midpoint of the other two stabilizers. Now, go back and mark two smaller notches 1 inch from either side of all three V’s. These smaller marks will be your guides for drilling the holes.

Now use the 1/8” drill bit to drill holes through each of the six smaller notches. Follow this up by using the countersink drill bit in each hole.


Prop your long board on top of the stabilizers and loosely clamp it to your work surface. Try to center the stabilizers as much as possible both between the notches as well as along the center of your board. Looking up from the underside of the board helps you get a better sense of their position. If possible, use a square to achieve perfect right angles. Using the 1/8″ drill bit again, drill through your six holes and down into the stabilizers. Secure the long board onto the stabilizers with your drywall screws.
At this point, you have your basic structure completed! You may want to take a moment to unclamp it and test it out on the edge of your workspace (or even the actual mantel) to make sure all of your measurements were correct and that it sits how you want it to.
Clamp the stocking holder in the upright position once again. Measure out and mark the midpoint for each of your hooks. I chose to use six hooks (for the four of us, the dog and maybe a future surprise!), so I spaced them 12 inches apart starting 6 inches from the end. You can also use some of the newest Command hooks that have a faux metallic finish if you want more flexibility to add/remove hooks in the future as well as a few less construction steps.

Lay out your hooks so you can get a visual of their placement, and pop a line along where you’d like the top of your hooks to be. Mark a dot inside each hole of the hooks, and screw the hooks onto your board using the included hardware. I went ahead and completed this step before painting just so I would have all of the measuring, drilling and construction out of the way. I simply unscrewed my hooks when I was ready to paint and replaced them again when the painting was done.

Start by painting the front and edges of your board white. After it dries, cut a 4-inch high parallelogram from cardstock or poster board to use as your candy cane stripe template, and mark the lines all the way down your board. Put a little “R” inside every other stripe to remind you which will be red; it is easy to get caught up in painting and get thrown off with your stripes! Carefully paint your red stripes, using painter’s tape for clean lines, and let dry completely before replacing your hooks.

There you have it! Once it’s in place on your mantel, set bricks or weights on each of the stabilizers for security. You can wrap bricks in neutral or festive wrapping paper to disguise them, or you can decorate your mantel as you normally would with garland and other holiday items to hide the weights.
If you want to take this project one step further, simply add miniature clothespins to the back of your candy cane board with wood glue for a clutter-free way to display your holiday cards (and another solution for hiding the weights)! This is also an easy project to adapt for other holidays and occasions. The candy cane version is sentimental to me, but I can think of a zillion other paint schemes and accents that would look fantastic as well. Feel free to make it your own!
Even if you’re not planning an ugly sweater party for Christmas in July this year, it is never too early to start a DIY. December will be here before we know it! Make sure to share your creations with us on Twitter, Facebook, or Instagram. We love to see how our tutorials inspire you!