I grew up in a DIY family. No task was too big, and no professionals were needed to tile floors, knock down walls, frame new ones, and Sheetrock fresh beginnings. All of these early lessons cultivated a passion for design and renovation. Not to mention, my twenty years of experience in the fashion industry, giving me a unique perspective and eye for coordination. Recently, I wrapped up a year-and-a-half renovation on a 1970s ranch-style home in the middle of Texas country. At first, I had to admit that it was a bit more than I could chew because I had never been the architect, general contractor, and designer for an entire house, but in the end, we couldn’t have been more thrilled with the result.
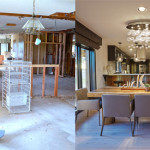
The goal of the renovation was to take this baby down to the studs and reconfigure a layout that would lend itself to a warm and open design while using every space throughout the house efficiently. The overall look would be modern yet timeless, incorporating as many repurposed and recycled materials as possible, but splurging on tile, technology, and designer pieces of furniture. The balance of old and new allowed me to keep the budget under $150 per square foot, and that price included the entire interior and exterior design and furniture. For the next few months, I’m excited to share this process from studs-to-sanctuary.
With the cold winter months surrounding us, I thought the perfect place to begin this DIY Ranch Design Series would be the cozy fireplace renovation.

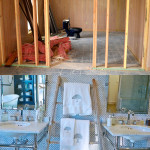
In order to create a more modern space, the first things that needed to go were all of the arches throughout the house. Before I even had the wherewithal to take a photo, the dated arches were removed on either side of the fireplace.


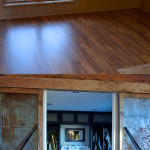
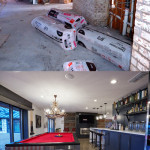
The main goal of the renovation was to construct a space with a nice flow where everyone was drawn to congregate. The fireplace would have to tie the living room, entertainment area, kitchen, and dining room together. Therefore, it was important to reframe this feature entirely and turn it into a see-through fireplace for continuity.

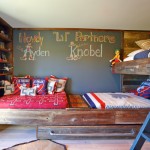
To incorporate as many recycled elements as possible and to prevent any of the old dilapidated barns on the property from going to waste, we stripped out the century-old large plank wood and used it in the design of the fireplace and bunk bed room, which I will share in a future post.


Once the old wood was put into place, the rest of the fireplace was wired for two 60-inch flat screen televisions. Then, the rest of the framing was Sheetrocked and prepared for the Venetian plaster.

Picking out colors, especially for permanent structures, has always been a challenge for me, but thankfully, this is where my fashion experience comes in. Brunello Cucinelli became my inspiration for the design and overall color palette for the entire house. Earth tones and the almost genderless neutrality of this luxury brand would help to create a harmonious balance of color between the textures we used like wood, concrete, and metal.


Now, with a new and larger sized fireplace, we had to consider fire safety, like adding doors and proper ventilation. We had a fire marshal come and inspect the existing fireplace, and we explained our desired changes. Then, we hired First Choice Chimney to reconfigure the interior and build the fireplace’s custom doors.
In addition to the doors, another and more cosmetic finishing touch was having custom cushions and pillows made for the built-in benches on the backside of the fireplace, facing the pool table and entertainment area. I decided to go with textiles by Ralph Lauren and Pendleton.


Lastly, it was imperative to find flat screen televisions the perfect size to hang. One way to do this is to use painter’s tape. As you can see in the photo, I decided to go with 60-inch televisions—a perfect fit.


On to the fun stuff—packing the firewood into its custom storage and incorporating my husband’s prized trophies on the façade of this see-through, wood-burning gas fireplace.


Thank you for joining me on this design journey. Do you think you’d ever attempt a big DIY project like this? It was a labor of love and imagination, and I’m just so happy to share it with my Model Behaviors friends.
Stay tuned for another DIY Ranch Design Series project next month!
Toni
PS: You can now follow us on Bloglovin!