I didn’t set out to become a ranch expert, but after redoing a few rooms and projects for friends, my husband entrusted me with a 1970s ranch house that he insisted was beyond saving. Initially, it was an investment for its land, and the house was supposed to be demolished. But with a $150 per-square-foot budget, I knew I had my work cut out for me, so I began to draw up a plan with both purpose and repurpose—the first to create functionality and the second to upcycle items that would help save on the budget. Three years later, we quadrupled our investment, and I’ve learned a thing or two that I’m already applying to our latest ranch renovation.
1) Go Reclaimed
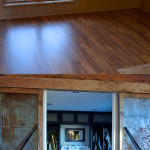
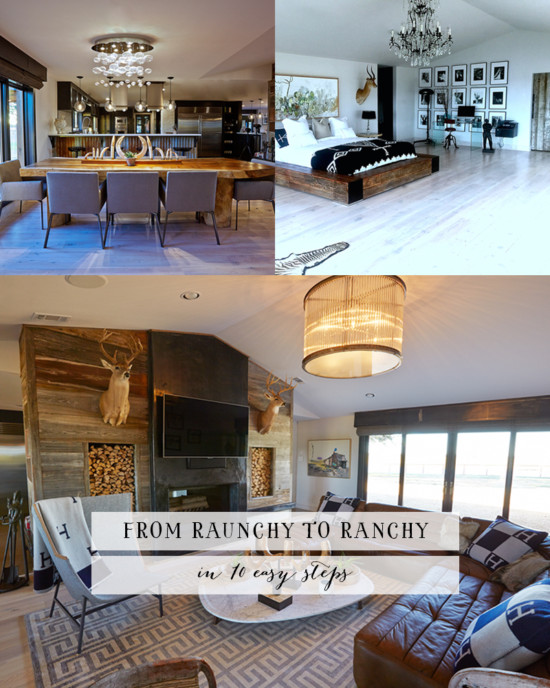
Besides saving money and feeling great about doing something green, visiting salvage yards and reclaimed warehouses is fun and can provide the renovation with some cool items and one-of-a-kind pieces. At my favorite local salvage yard, I found amazing barn doors from the 1800s and located enough reclaimed pine flooring to do half of the house with wood floors (we did the other half in concrete).


Related – DIY Ranch Design Series: Open-Concept Dining Room
2) Turn the Laundry Room Into a Mudroom
It’s simple—ranches get dirty! And the first thing people want to do is walk in and take their muddy boots off. So, it just makes sense to be able to walk in and have a place close to the front or back door where muddy boots can be stored away, dirty hands can be rinsed off, and soiled clothes can be washed.


Related – DIY Ranch Design Series: The Mudroom
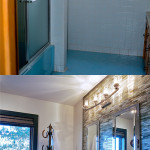
3) Consider Light-Colored, Durable Flooring
There were many reasons why I chose to go with concrete floors for the other areas of the house. The first reason is an obvious one, there is a significant dust factor out in the country, and dark floors show all of the dust and debris. I also chose concrete for durability. Concrete flooring is great for kitchens, bathrooms, and high-traffic areas.


Related – DIY Ranch Design Series: The Master Bedroom
4) Bring the Outside In
With so many dilapidated wood and metal barns on the property, it would’ve been a travesty not to incorporate these weathered items into the home. The old barn wood and corrugated metal were cost-effective ways to spruce up dated features, like the fireplace. We were lucky enough to have these items at our disposal, but these types of items are easily found at salvage yards and reclaimed warehouses.


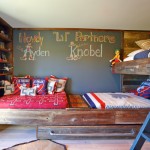
Related – DIY Ranch Design Series: Kids Room
5) Reupholster With Blankets and Cowhide
Nothing says ranchy like colorful wool blankets and cowhide. They’re the accent pieces, and—when done right—they can add just enough ranch nostalgia. A word of warning, though. When done incorrectly, they can be downright nauseating. I studied fashion designers, my favorite art pieces, and many other sources to help me pick out the perfect theme and color combo. Definitely do your research for this step!

Related – DIY Ranch Design Series: The Master Bathroom
6) Eliminate Wasted Space
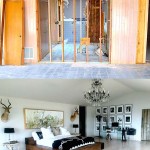
At a ranch, the exterior sings of wide-open terrain, and so should the interior. But this house cried of cramped, choppy rooms. There was a total disconnect between the two. Privacy walls, built-in cabinetry, and doors on top of doors can make a house feel small and uninviting. So knock down those privacy walls, gut the built-ins, and add glass to doors to generate flow and use of space.


Related – DIY Ranch Design Series: The Blue Bathroom
7) Use Ranch Items As Accessories
Now, this is where things can really get fun and creative. I took some of my husband’s old guns and made sure they were nonfunctioning. Once I brought them to the gun store to confirm this, I had my welder turn them into handles for the barn doors. It was a similar situation for some old tractor seats that I found on eBay. The welder turned those tractor seats into stools for the breakfast bars. Another fun idea is to use horseshoes for a coat rack.


Related – DIY Ranch Design Series: Darlington’s Bee Barn
8) Make Old Windows New With Dark Trim
Windows are make-or-break items. They can be the finishing touch on a house or they can entirely break a budget. Replacing every window might be great for heating and cooling bills but with a dark trim, new life can breathe into the oldest of windows.


Related – DIY Ranch Design Series: At-Home Gym
9) Create Living Space Around One Focal Point
Ranches are meant to be spaces where friends and family can gather, so give them something to gather around and talk about. The kitchen and fireplace are usually the places to do just that. Provide enough seating and a big enough pathway that will allow company to meander with ease.

Related – DIY Ranch Design Series: Dine and Entertain
10) Give an Old Fireplace a Makeover
And since we’re on the topic of fireplaces, I’ve never met an old one that didn’t need a facelift. What ends up happening is that everyone can identify the age of the house based on the fireplace alone. There are many great ways that an eyesore can be transformed into the welcomed sight for sore eyes. Creating a see-through fireplace, reframing the existing fireplace to give it a new shape, or putting up new tile or stone are all ways to update the focal point of the house.


Related – DIY Ranch Design Series: The Fireplace
When it comes to wide-open spaces, it doesn’t take much to go from raunchy to ranchy, just enough dirt to get your hands dirty.
Don’t want to miss a post? Follow us on Bloglovin’ and receive each new post directly in your inbox!